Linux Installation


Insights installation scripts has been tested on below versions

  • RHEL 7.x, CentOS 7.5, Ubuntu (Upto Insights v9.8)
  • RHEL 8.x  (> Insights v9.9)

Other OS flavors might have few issues with script which needs to be addressed individually. It is recommended that you run one script at a time. Only when each step is successful, you move to next step. 

 Standard Hardware configurations for Linux

Please check Software Hardware and open port information before starting installation 

Software and Hardware

Linux server - 64 bit - 24 GB RAM and 500 GB HDD (Two in number, one for databases and another for hosting applications and other tools)

Capacity Requirements may vary based on the amount of data that needs to be indexed and purpose of installation like POC and Prod deployment.

 Linux Installation Instructions
 RHEL7x, CentOS7x,RHEL8

RHEL7x, CentOS7x,RHEL8

RHEL 7.x, CentOS 7.5.x,RHEL 8  installation is automated via shell scripts.

Execute the Shell script

To execute individual components

To execute scripts individually, follow the below sequence:

 Single machine POC setup (POC purpose Only)


Production Setup:

Our recommendation is to install Neo4j and ES on Machine 1, and all remaining components on Machine 2.

Server1 :  (To execute scripts individually, follow the below sequence:)


RHEL7RHEL8
1

insights_first.sh

insights_first
2insights_javainsights_java
3insights_neo4jinsights_neo4j
4

insights_es (Optional, Needed only for Data Archival Feature )

insights_es

Server2: (To execute scripts individually, follow the below sequence)         


  1. NOTE: apache2 serves as a reverse proxy to insights services (say Tomcat, grafana, elasticsearch,etc). 
  2. The configuration respective to service port will be specified in the apache2 configuration file.

Verify URL's -

Elastic Search: http://hostname:9200

Neo4j: http://hostname:7474

RabbitMQ: http://hostname:15672

Grafana: http://hostname:3000

Insights app: http://hostname:8080/insights

 Ubuntu Installation 16.04.x


Follow the step-by-step instructions given below - 

Verify URL's -

Elastic Search: http://hostname:9200

Neo4j: http://hostname:7474

RabbitMQ: http://hostname:15672

Grafana: http://hostname:3000

Insights app: http://hostname:8080/app

The above steps will install Insights in non secure (http) mode. For a secure mode (https) installation, please create the necessary certificates for Grafana, Apache & Tomcat and change the configuration in Apache httpd.conf

 Other Linux flavors

Follow the step-by-step instructions given below - 

Verify URL's -

Elastic Search: http://hostname:9200

Neo4j: http://hostname:7474

RabbitMQ: http://hostname:15672

Grafana: http://hostname:3000

Insights app: http://hostname:8080/app

The above steps will install Insights in non secure (http) mode. For a secure mode (https) installation, please create the necessary certificates for Grafana, Apache & Tomcat and change the configuration in Apache httpd.conf

Below artifacts are developed and tested as part of Insights.

Please download the artifacts using URL: https://github.com/CognizantOneDevOps/Insights/releases/

  • Platform Service WAR
  • Platform Engine JAR
  • Platform UI
  • Platform Daemon Agents

 RHEL/CentOS Apache2 httpd http Installation and Setup

Steps for httpd configuration in RHEL


Step 1: As httpd packages are already present in the server, install using the following commands

  1. yum install httpd -y
  2. cd /etc/httpd/conf

  3. rm -f httpd.conf
  4. wget https://onedevops.atlassian.net/wiki/pages/viewpageattachments.action?pageId=450592772&preview=%2F450592772%2F2593718273%2Fhttpd.conf
  5. cd /etc/httpd/conf.d
  6. rm -f httpd-vhosts.conf
  7. wget https://onedevops.atlassian.net/wiki/pages/viewpageattachments.action?pageId=450592772&preview=%2F450592772%2F2593652745%2Fhttpd-vhosts.conf
  8. Open httpd-vhosts.conf file and update section

    <VirtualHost *:80> <IfModule mod_proxy_ajp.c>

    and add following line (replace your application server host name ex 'http://insight.devops.com' )

    Header set Access-Control-Allow-Origin '<hostname>'

  9. systemctl restart httpd.service


Step 2: Make change  in the  server-confing.json (location: $INSIGHTS_HOME/.InSights )  grafanaEndpoint  

           "grafanaEndpoint": "http://ip:3000"  to

            "grafanaEndpoint" :  "http://ip/grafana


Step 3: Change grafana host in the uiConfig.json file in the location: TOMCAT_HOME/webapps/app/config

       "grafanaHost": "http://ip:3000",  to  "grafanaHost": "http://ip/grafana",

Change Sevicehost  in the uiConfig.json file in the location: TOMCAT_HOME/webapps/app/config

  "serviceHost": "ip:8080",  to  "serviceHost": "ip",


Step 4:  create a file  file name custom.ini in the location /opt/grafana/conf

add the following contents

custom.ini

Step 5: Restart Grafana

Step 6: Restart Tomcat


 RHEL/CentOS Apache2 httpd https Installation and Setup


Install Apache2 httpd

Step 1: sudo yum install httpd

Step 2: sudo systemctl enable httpd.service

Install Mod SSL

Step 3sudo yum install mod_ssl

Create a New Certificate

Step 4sudo mkdir /etc/ssl/private

Step 5: sudo chmod 700 /etc/ssl/private

Step 6: sudo openssl req -x509 -nodes -days 365 -newkey rsa:2048 -keyout /etc/ssl/private/apache-selfsigned.key -out /etc/ssl/certs/apache-selfsigned.crt

Fill out the prompts appropriately. The most important line is the one that requests the Common Name. You need to enter the domain name that you want to be associated with your server. You can enter the public IP address instead if you do not have a domain name.

The full list of prompts will look something like this:

Country Name (2 letter code) [XX]:US
State or Province Name (full name) []:Example
Locality Name (eg, city) [Default City]:Example 
Organization Name (eg, company) [Default Company Ltd]:Example Inc
Organizational Unit Name (eg, section) []:Example Dept
Common Name (eg, your name or your server's hostname) []:example.com
Email Address []:webmaster@example.com

Both of the files you created will be placed in the appropriate subdirectories of the /etc/ssldirectory.

While we are using OpenSSL, we should also create a strong Diffie-Hellman group, which is used in negotiating Perfect Forward Secrecy with clients.

We can do this by typing:

Step 7: sudo openssl dhparam -out /etc/ssl/certs/dhparam.pem 2048

This may take a few minutes, but when it’s done you will have a strong DH group at /etc/ssl/certs/dhparam.pem that we can use in our configuration.

Since the version of Apache that ships with CentOS 7 does not include the SSLOpenSSLConfCmddirective, we will have to manually append the generated file to the end of our self-signed certificate. To do this, type:

Step 8: cat /etc/ssl/certs/dhparam.pem | sudo tee -a /etc/ssl/certs/apache-selfsigned.crt

Set Up the Certificate


Step 9: sudo vi /etc/httpd/conf.d/ssl.conf

Adjusting the VirtualHost Directives

First, uncomment the DocumentRoot line and edit the address in quotes to the location of your site’s document root. By default, this will be in /var/www/html, and you don’t need to change this line if you have not changed the document root for your site. However, if you followed a guide like our Apache virtual hosts setup guide, your site’s document root may be different.

Next, uncomment the ServerName line and replace www.example.com with your domain name or server IP address (whichever one you put as the common name in your certificate)

File Contents:  /etc/httpd/conf.d/ssl.conf


<VirtualHost _default_:443> . . . DocumentRoot "/var/www/" ServerName localhost:443

Next, find the SSLProtocol and SSLCipherSuite lines and either delete them or comment them out. The configuration we be pasting in a moment will offer more secure settings than the default included with CentOS’s Apache:

File content : /etc/httpd/conf.d/ssl.conf

. . .
# SSLProtocol all -SSLv2
. . .
# SSLCipherSuite HIGH:MEDIUM:!aNULL:!MD5:!SEED:!IDEA

Find the SSLCertificateFile and SSLCertificateKeyFile lines and change them to the directory we made at /etc/httpd/ssl:

File contents: /etc/httpd/conf.d/ssl.conf

SSLCertificateFile /etc/ssl/certs/apache-selfsigned.crt
SSLCertificateKeyFile /etc/ssl/private/apache-selfsigned.key

Open httpd-vhosts.conf file and update section


<VirtualHost *:443> <IfModule mod_proxy_ajp.c>


and add following line (replace your application server host name ex 'https://insight.devops.com' )


Header set Access-Control-Allow-Origin '<hostname>'


We’re now done with the changes within the actual VirtualHost block. The next changes will take place after the ending </VirtualHost> tag within this same file.


Setting Up Secure SSL Parameters


The choice of which config you use will depend largely on what you need to support. They both will provide great security.


For our purposes, we can copy the provided settings in their entirety. We will just make two small changes.


The other change we will make is to comment out the SSLSessionTickets directive, since this isn’t available in the version of Apache shipped with CentOS 7.


Paste in the settings from the site AFTER the end of the VirtualHost block:

File Contents: /etc/httpd/conf.d/ssl.conf


    . . .
</VirtualHost>
. . .

# Begin copied text
# from https://cipherli.st/
# and https://raymii.org/s/tutorials/Strong_SSL_Security_On_Apache2.html

SSLCipherSuite EECDH+AESGCM:EDH+AESGCM:AES256+EECDH:AES256+EDH
SSLProtocol All -SSLv2 -SSLv3
SSLHonorCipherOrder On
# Disable preloading HSTS for now.  You can use the commented out header line that includes
# the "preload" directive if you understand the implications.
#Header always set Strict-Transport-Security "max-age=63072000; includeSubdomains; preload"
Header always set Strict-Transport-Security "max-age=63072000; includeSubdomains"
Header always set X-Frame-Options DENY
Header always set X-Content-Type-Options nosniff
# Requires Apache >= 2.4
SSLCompression off 
SSLUseStapling on 
SSLStaplingCache "shmcb:logs/stapling-cache(150000)" 
# Requires Apache >= 2.4.11
# SSLSessionTickets Off

When you are finished making these changes, you can save and close the file.

Step 10: Copy the following contents at the end of </VirtualHost>

Copy the following to ssl.conf

<Proxy balancer://grafanaHome>
BalancerMember http://localhost:3000 route=route1
ProxySet lbmethod=bybusyness
</Proxy>
<Location /grafana>
Order allow,deny
Allow from all
ProxyPass balancer://grafanaHome stickysession=JSESSIONID
</Location>


<Proxy balancer://rabbitMqHome>
BalancerMember http://localhost:15672 route=route1
ProxySet lbmethod=bybusyness
</Proxy>
<Location /mq>
Order allow,deny
Allow from all
ProxyPass balancer://rabbitMqHome stickysession=JSESSIONID
</Location>

<Proxy balancer://neo4jHome>
BalancerMember http://localhost:7474/browser route=route1
ProxySet lbmethod=bybusyness
</Proxy>
<Location /neo4j>
Order allow,deny
Allow from all
ProxyPass balancer://neo4jHome stickysession=JSESSIONID
</Location>


<Proxy balancer://webhookHome>
BalancerMember http://localhost:8981 route=route1
ProxySet lbmethod=bybusyness
</Proxy> 	  
<Location /webhook>
Order allow,deny
Allow from all
ProxyPass balancer://webhookHome stickysession=JSESSIONID
</Location>


<Proxy balancer://OneDevOpsHome>
BalancerMember http://localhost:8080/app
ProxySet lbmethod=bybusyness
</Proxy>
<Location /app>
Order allow,deny
Allow from all
ProxyPass balancer://OneDevOpsHome stickysession=JSESSIONID
</Location>

ProxyPass "/PlatformService/" "http://localhost:8080/PlatformService/"


Activate the Certificate

First, check your configuration file for syntax errors by typing:


Step 11:  sudo apachectl configtest

As long as the output ends with Syntax OK, you are safe to continue. If this is not part of your output, check the syntax of your files and try again:


Output

. . . Syntax OK
Restart the Apache server to apply your changes by typing:

Step 12: sudo systemctl restart httpd.service

Step 13: Make change  in the  server-confing.json (location: /usr/INSIGHTS_HOME/.InSights )  grafanaEndpoint  

           "grafanaEndpoint": "http://ip:3000"  to

            "grafanaEndpoint" :  "http://ip/grafana


Step 14: Change grafana host in the uiConfig.json file in the location: TOMCAT_HOME/webapps/app/config

       "grafanaHost": "http://ip:3000",  to  "grafanaHost": "http://ip/grafana",

Change Sevicehost  in the uiConfig.json file in the location: /opt/apache-tomcat/webapps/app/config

  "serviceHost": "ip:8080",  to  "serviceHost": "ip",


Step 15:  create a file  file name custom.ini in the location /opt/grafana/conf

add the following contents

[server]
root_url = http://localhost:3000/grafana

Step 5: Restart Grafana

Step 6: Restart Tomcat


Step 16:  Follow the steps mentioned here to establish a secure encrypted communication between Insights Application box and Neo4j database box 


 Neo4j SSL Configuration


Objective: Customer wants to have a secured encrypted communication between Insights Application box and Neo4j database box. Typically, on Insights Customer implementation, we have two boxes where Server-1 contains all Insights components except Neo4j database and Server-2 contains Neo4j database. Insights Application fetches data from Neo4j DB and displays in various screens of Insights UI and Insights Dashboards or Grafana also fetches data from Neo4j DB to display in the dashboards. Those database connections were not encrypted or HTTPS so far.

This document will help you to create HTTPS connection to Neo4j Database.

  1. Create a SSL certificate and its corresponding Key. Please refer following document available in the Confluence to install mod SSL and create a new certificate and key.             

    https://onedevops.atlassian.net/wiki/spaces/OI/pages/450592772/Linux+Installation

    Please refer (RHEL/CentOS Apache2 httpd https Installation and Setup) section in the above URL.

    Certificate will be generated inside /etc/ssl/certs folder and private key(.key) will be generated inside /etc/ssl/private folder.
  2. For Neo4j version 3.5.8, we need to perform following steps.
  3. We need to keep self-signed *.certs and *.key files inside Neo4j certificate folder.

    For example:
              neo4j-selfsigned.crt (public certificate) and neo4j-selfsigned.key (private key) files should be kept inside /opt/NEO4J_HOME/neo4j-Insights/certificates folder.

  4. Developers need to create two empty folders - trusted and revoked inside Neo4j certificates folder.

$neo4j-home> ls certificates

-r-------- ...   neo4j-selfsigned.key

-rw-r--r-- ... neo4j-selfsigned.crt

drwxr-xr-x ... revoked

drwxr-xr-x ... trusted

      5. Following properties should be uncommented, configured and set correctly inside neo4j.conf file to enable SSL access inside Neo4j.

dbms.connectors.default_listen_address=0.0.0.0

dbms.connectors.default_advertised_address=<<hostname or IP address of Neo4j server using which Neo4j will be accessed>>

# Bolt connector

dbms.connector.bolt.enabled=true

dbms.connector.bolt.tls_level=REQUIRED  (This property has to be REQUIRED not OPTIONAL)

dbms.connector.bolt.listen_address=0.0.0.0:7687

# HTTP Connector. There can be zero or one HTTP connectors.

dbms.connector.http.enabled=false (We’ve disabled http access by setting this property false)

dbms.connector.http.listen_address=0.0.0.0:7474

# HTTPS Connector. There can be zero or one HTTPS connectors.

dbms.connector.https.enabled=true

dbms.connector.https.listen_address=0.0.0.0:7473

#*****************************************************************

# SSL system configuration

#*****************************************************************

bolt.ssl_policy=default

https.ssl_policy=default

#*****************************************************************

# SSL policy configuration

#*****************************************************************

# Mandatory setting

dbms.ssl.policy.default.base_directory=/opt/NEO4J_HOME/neo4j-Insights/certificates

dbms.ssl.policy.default.allow_key_generation=false

#dbms.ssl.policy.default.trust_all=false

dbms.ssl.policy.default.private_key=/opt/NEO4J_HOME/neo4j-Insights/certificates/neo4j-selfsigned.key

dbms.ssl.policy.default.public_certificate=/opt/NEO4J_HOME/neo4j-Insights/certificates/neo4j-selfsigned.crt

dbms.ssl.policy.default.trusted_dir=/opt/NEO4J_HOME/neo4j-Insights/certificates/trusted

dbms.ssl.policy.default.client_auth=NONE\

Note: For Neo4j version 3.5.8, we must provide full path of neo4j certificate and key files inside neo4j.conf file. It will not be able to understand absolute path here. Neo4j 4.4.1 can understand absolute path.

For Neo4j 4.4.1 version:

The 4.0 series of Neo4j has some key differences in how to configure SSL from 3.5. There is a directory of certificates per “connector” (bolt, HTTPS, cluster), and the config options have changed a bit.

  • The scope is the name of the communication channel, and must be one of bolt, https, cluster, backup or fabric in case of Neo4j 4.4.1. We need to create separate folder inside certificate folder of neo4j. For example: Here we’ll create bolt and https folders inside certificates folder of Neo4j.
  • We need to create two create two folders- trusted and revoked inside bolt and https folder. trusted and revoked can remain empty.
  • We are going to put neo4j-selfsigned.key and neo4j-selfsigned.crt inside bolt and https folder to be accessed by Neo4j SSL.
  • Finally, we make changes inside our neo4j configuration file (neo4j.conf). We need to uncomment or add and configure following properties as per your Neo4j configuration.

    dbms.default_listen_address=0.0.0.0
    dbms.default_advertised_address=your.hostname.com


    # HTTP Connector. There can be zero or one HTTP connectors.

    dbms.connector.http.enabled=false (We’ve disabled http access by setting this property false)

    dbms.connector.http.listen_address=0.0.0.0:7474


    dbms.connector.https.enabled=true

    dbms.connector.bolt.enabled=true

    dbms.connector.bolt.tls_level=REQUIRED (This property must be REQUIRED not OPTIONAL)


    # BOLT Connector
    dbms.ssl.policy.bolt.enabled=true

    dbms.ssl.policy.bolt.base_directory =bolt
    dbms.ssl.policy.bolt.private_key= neo4j-selfsigned.key

    dbms.ssl.policy.bolt.public_certificate= neo4j-selfsigned.crt dbms.ssl.policy.bolt.client_auth=NONE


    # HTTPS connector
    dbms.ssl.policy.https.enabled=true

  dbms.ssl.policy.https.base_directory=https
  dbms.ssl.policy.https.private_key= neo4j-selfsigned.key dbms.ssl.policy.https.public_certificate=neo4j-selfsigned.crt

  dbms.ssl.policy.https.client_auth=NONE

NOTE: If you’re using certificates and SSL, you should strongly consider disabling HTTP access on port 7474 to your Neo4j instance.

Neo4j Data Source Configuration inside Grafana:


We need to create a secured Neo4j data source inside Grafana to showcase Panels and Dashboards. If you have an existing Neo4j data source already created inside Grafana, you can modify that by following steps or create a new secured Neo4j data source using following steps.

  1. When we create a Neo4j data source, we need to give https url of Neo4j server and port number should be 7473 as it’s reserved for Neo4j https access.

  2. Under Auth section of Neo4j data source, we need to select above 3 options.

    I. Basic Auth

    II. With CA Cert

    III. Skip TLS Verify


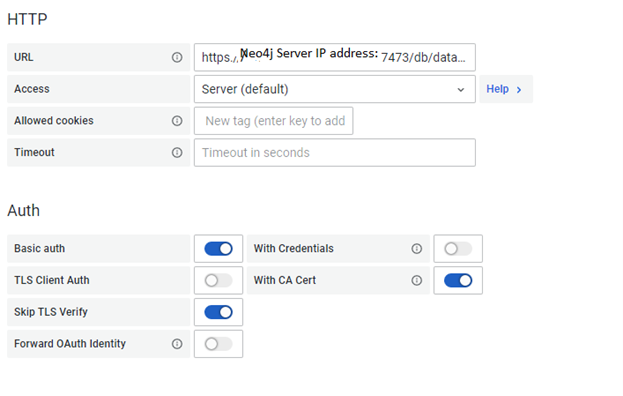
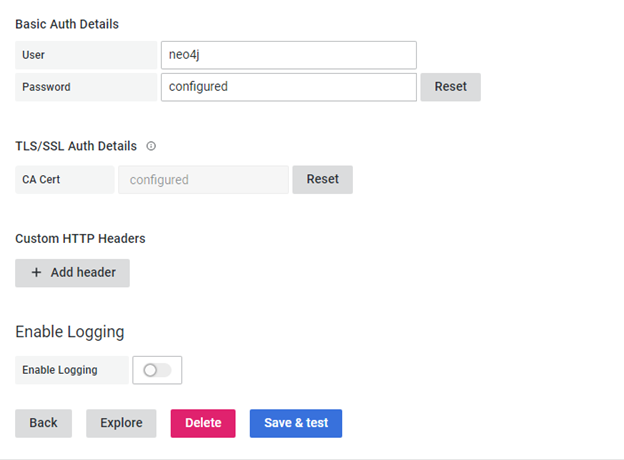
  3.  We need to fill up TLS/SSL Auth Details under TLS/SSL Auth Details section. We need to copy paste the self-signed certificate or TLS certificate. We can copy paste the text inside the Certificate and put it here including Begin and End certificate. PFB the screenshot once certificate configured inside datasource.


    We’ll be able to access Neo4j using this URL – https://hostname:7473/browser after making these configurations.

  We need to provide this HTTPS url of Neo4j inside graph section of server-config.json file. PlatformService, PlatformDAL and PlatformEngine will be using this secured URL.

Troubleshooting:

Issue 1

We’ve faced following error when PlatformEngine tries to insert data into Neo4j using secured connection.

t=2022-04-29 13:24:09 lvl=ERROR [pool-3-thread-6]:WebHookDataSubscriber.handleDelivery()100 :: message= toolName=GITLAB agentId=gitLab_jobs routingKey=IPW_gitLab_jobs Error while storing Webhook data javax.ws.rs.ProcessingException: javax.net.ssl.SSLHandshakeException: No subject alternative DNS name matching <HOST name of Neo4j box> found.

        at org.glassfish.jersey.client.internal.HttpUrlConnector.apply(HttpUrlConnector.java:261) ~[PlatformEngine.jar:8.9]

        at org.glassfish.jersey.client.ClientRuntime.invoke(ClientRuntime.java:296) ~[PlatformEngine.jar:8.9]

        at org.glassfish.jersey.client.JerseyInvocation.lambda$invoke$1(JerseyInvocation.java:623) ~[PlatformEngine.jar:8.9]

        at org.glassfish.jersey.client.internal.HttpUrlConnector._apply(HttpUrlConnector.java:361) ~[PlatformEngine.jar:8.9]

        at org.glassfish.jersey.client.internal.HttpUrlConnector.apply(HttpUrlConnector.java:259) ~[PlatformEngine.jar:8.9]

        ... 20 more

Caused by: java.security.cert.CertificateException: No subject alternative DNS name matching <HOST name of Neo4j box>  found.

        at sun.security.util.HostnameChecker.matchDNS(HostnameChecker.java:230) ~[?:1.8.0_312]

Resolution:

In order to resolve this issue we need to enter the value of Subject Alternative property inside openssl.cnf file. This issue is coming as ssl certificate file doesn’t contain Subject Alternative property and its value which should be the host name or IP address of Neo4j box in this case. When PlatformEngine is trying to validate the Neo4j certificate, it fails due to missing subject alternative property.

Please complete following steps to remove this error.

  • We need to add [ subject_alt_name ] and 'subjectAltName properties inside openssl.cnf file using following two commands. (On Unix box)

    1. echo '[ subject_alt_name ]' >> openssl.cnf
    2. echo 'subjectAltName = DNS: <HOST name of Neo4j box> '>> openssl.cnf

  • When we read openssl.cnf file after adding Subject Alternative property, it’ll look like below.

[ subject_alt_name ]

subjectAltName = DNS: <HOST name of Neo4j box>

 If you would like to add IP of Neo4j box, it’ll look like below inside openssl.cnf file.

[ subject_alt_name ]

subjectAltName = IP: <IP of Neo4j box>

  • After this we need to create SSL certificate and key using this modified openssl.cnf file. Please use following command to create the same. Here we are explicitly adding subject_alt_name property value inside the certificate and key which is to be generated.

 sudo openssl req -x509 -nodes -days 730 -newkey rsa:2048 -config openssl.cnf -extensions subject_alt_name -keyout /etc/ssl/private/neo4j-selfsigned.key -out /etc/ssl/certs/neo4j-selfsigned.crt

  • Once certificate and key gets created , we need to copy those files and paste them inside bolt and https folders of Neo4j certificates folder.
  • Restart Neo4j
  • After that you should be able to access Neo4j using – https://hostname:7473/browser URL
  • PlatformService, PlatformDAL and PlatformEngine now will be using this secured URL – https://hostname:7473/browser without any error.


Issue 2 


Error :

2023-02-07 14:10:39 DEBUG [EngineAggregatorModule]:modules.users.EngineUsersModule.createEngineStatusNode()46 DEBUG::  Engine version 

2023-02-07 14:10:39 ERROR [EngineAggregatorModule]:core.util.SystemStatus.addSystemInformationInNeo4j()54 ERROR::  Neo4j Node not created javax.net.ssl.SSLHandshakeException: sun.security.validator.ValidatorException: PKIX path building failed: sun.security.provider.certpath.SunCertPathBuilderException: unable to find valid certification path to requested target


Solution :

We need to add the neo4j certificate to the java trusted source in the server where Insights Engine is installed with the help of the following command.


  • cd /opt/jdklinux/bin ( the $JAVA_HOME path)
  • ./keytool -import -alias neo4jselfsigned.crt -file /servermigration/ neo4jselfsigned.crt  -storetype JKS -keystore /opt/jdklinux/jre/lib/security/cacerts

Note: The default password for the keystore is ‘changeit’

we can verify the installed certs with the help of the following command.

./keytool -list -keystore /opt/jdklinux/jre/lib/security/cacerts  -- to see list of install certificate

Once you find the install certificate in the list , you can restart the engine and see the data is consumed to Neo4j.


Top Section

©2021 Cognizant, all rights reserved. US Patent 10,410,152