Apache2 Httpd Installation and Proxy Setup
MadanaGopal.Ragupathy@cognizant.com (Unlicensed)
Tharun Kumar K (Unlicensed)
Hari (Unlicensed)
Apache http server provides a secure, efficient and extensible server that provides HTTP services in sync with the current HTTP standards
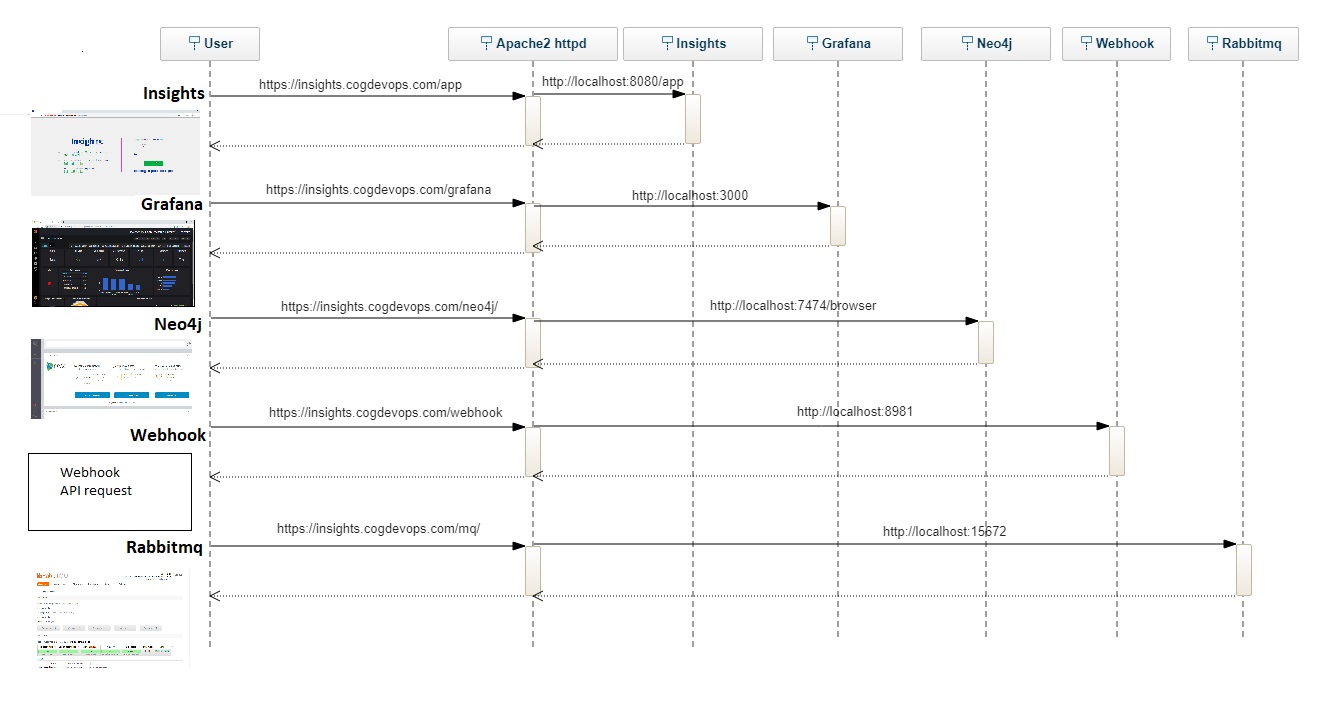
Insights uses Apache httpd server to securely access Insights User Interface, Grafana, Neo4j, RabbitMq, and Webhook.
Steps for httpd configuration in RHEL
Step 1: As httpd packages are already present in the server, install using the following commands
- yum install httpd -y
cd /etc/httpd/conf
- rm -f httpd.conf
- wget https://onedevops.atlassian.net/wiki/download/attachments/93192312/http_httpd.conf?version=1&modificationDate=1653483870669&cacheVersion=1&api=v2
- cd /etc/httpd/conf.d
- rm -f httpd-vhosts.conf
- wget https://onedevops.atlassian.net/wiki/download/attachments/93192312/http-httpd-vhosts.conf?version=1&modificationDate=1653483924051&cacheVersion=1&api=v2
- systemctl restart httpd.service
Step 2: Make change in the server-confing.json (location: /usr/INSIGHTS_HOME/.InSights ) grafanaEndpoint
"grafanaEndpoint": "http://ip:3000" to
"grafanaEndpoint" : "http://ip/grafana"
Step 3: Change grafana host in the uiConfig.json file in the location: /opt/apache-tomcat-8.5.27/webapps/app/config
"grafanaHost": "http://ip:3000", to "grafanaHost": "http://ip/grafana",
Change Sevicehost in the uiConfig.json file in the location: /opt/apache-tomcat-8.5.27/webapps/app/config
"serviceHost": "ip:8080", to "serviceHost": "ip",
Step 4: create a file file name custom.ini in the location /opt/grafana/conf
add the following contents
Step 5: Restart Grafana
Step 6: Restart Tomcat
Install Apache2 httpd
Step 1: sudo yum install httpd
Step 2: sudo systemctl enable httpd.service
Install Mod SSL
Step 3: sudo yum install mod_ssl
Create a New Certificate
Step 4: sudo mkdir /etc/ssl/private
Step 5: sudo chmod 700 /etc/ssl/private
Step 6: sudo openssl req -x509 -nodes -days 365 -newkey rsa:2048 -keyout /etc/ssl/private/apache-selfsigned.key -out /etc/ssl/certs/apache-selfsigned.crt
Fill out the prompts appropriately. The most important line is the one that requests the Common Name. You need to enter the domain name that you want to be associated with your server. You can enter the public IP address instead if you do not have a domain name.
The full list of prompts will look something like this:
Country Name (2 letter code) [XX]:US
State or Province Name (full name) []:Example
Locality Name (eg, city) [Default City]:Example
Organization Name (eg, company) [Default Company Ltd]:Example Inc
Organizational Unit Name (eg, section) []:Example Dept
Common Name (eg, your name or your server's hostname) []:example.com
Email Address []:webmaster@example.com
Both of the files you created will be placed in the appropriate subdirectories of the /etc/ssldirectory.
While we are using OpenSSL, we should also create a strong Diffie-Hellman group, which is used in negotiating Perfect Forward Secrecy with clients.
We can do this by typing:
Step 7: sudo openssl dhparam -out /etc/ssl/certs/dhparam.pem 2048
This may take a few minutes, but when it’s done you will have a strong DH group at /etc/ssl/certs/dhparam.pem that we can use in our configuration.
Since the version of Apache that ships with CentOS 7 does not include the SSLOpenSSLConfCmddirective, we will have to manually append the generated file to the end of our self-signed certificate. To do this, type:
Step 8: cat /etc/ssl/certs/dhparam.pem | sudo tee -a /etc/ssl/certs/apache-selfsigned.crt
Set Up the Certificate
Step 9: sudo vi /etc/httpd/conf.d/ssl.conf
Adjusting the VirtualHost Directives
First, uncomment the DocumentRoot line and edit the address in quotes to the location of your site’s document root. By default, this will be in /var/www/html, and you don’t need to change this line if you have not changed the document root for your site. However, if you followed a guide like our Apache virtual hosts setup guide, your site’s document root may be different.
Next, uncomment the ServerName line and replace www.example.com with your domain name or server IP address (whichever one you put as the common name in your certificate)
File Contents: /etc/httpd/conf.d/ssl.conf
<VirtualHost _default_:443>
. . .
DocumentRoot "/var/www/"
ServerName localhost:443
Next, find the SSLProtocol and SSLCipherSuite lines and either delete them or comment them out. The configuration we be pasting in a moment will offer more secure settings than the default included with CentOS’s Apache:
File content : /etc/httpd/conf.d/ssl.conf
. . .
# SSLProtocol all -SSLv2
. . .
# SSLCipherSuite HIGH:MEDIUM:!aNULL:!MD5:!SEED:!IDEA
Find the SSLCertificateFile and SSLCertificateKeyFile lines and change them to the directory we made at /etc/httpd/ssl:
File contents: /etc/httpd/conf.d/ssl.conf
SSLCertificateFile /etc/ssl/certs/apache-selfsigned.crt
SSLCertificateKeyFile /etc/ssl/private/apache-selfsigned.key
We’re now done with the changes within the actual VirtualHost block. The next changes will take place after the ending </VirtualHost> tag within this same file.
Setting Up Secure SSL Parameters
The choice of which config you use will depend largely on what you need to support. They both will provide great security.
For our purposes, we can copy the provided settings in their entirety. We will just make two small changes.
The other change we will make is to comment out the SSLSessionTickets directive, since this isn’t available in the version of Apache shipped with CentOS 7.
Paste in the settings from the site AFTER the end of the VirtualHost block:
File Contents: /etc/httpd/conf.d/ssl.conf
    . . .
</VirtualHost>
. . .

# Begin copied text
# from https://cipherli.st/
# and https://raymii.org/s/tutorials/Strong_SSL_Security_On_Apache2.html

SSLCipherSuite EECDH+AESGCM:EDH+AESGCM:AES256+EECDH:AES256+EDH
SSLProtocol All -SSLv2 -SSLv3
SSLHonorCipherOrder On
# Disable preloading HSTS for now.  You can use the commented out header line that includes
# the "preload" directive if you understand the implications.
#Header always set Strict-Transport-Security "max-age=63072000; includeSubdomains; preload"
Header always set Strict-Transport-Security "max-age=63072000; includeSubdomains"
Header always set X-Frame-Options DENY
Header always set X-Content-Type-Options nosniff
# Requires Apache >= 2.4
SSLCompression off
SSLUseStapling on
SSLStaplingCache "shmcb:logs/stapling-cache(150000)"
# Requires Apache >= 2.4.11
# SSLSessionTickets Off
When you are finished making these changes, you can save and close the file.
Step 10: Copy the following contents at the end of </VirtualHost>
Copy the following to ssl.conf
<Proxy balancer://grafanaHome>
BalancerMember http://localhost:3000 route=route1
ProxySet lbmethod=bybusyness
</Proxy>
<Location /grafana>
Order allow,deny
Allow from all
ProxyPass balancer://grafanaHome stickysession=JSESSIONID
</Location>
<Proxy balancer://rabbitMqHome>
BalancerMember http://localhost:15672 route=route1
ProxySet lbmethod=bybusyness
</Proxy>
<Location /mq>
Order allow,deny
Allow from all
ProxyPass balancer://rabbitMqHome stickysession=JSESSIONID
</Location>
<Proxy balancer://neo4jHome>
BalancerMember http://localhost:7474/browser route=route1
ProxySet lbmethod=bybusyness
</Proxy>
<Location /neo4j>
Order allow,deny
Allow from all
ProxyPass balancer://neo4jHome stickysession=JSESSIONID
</Location>
<Proxy balancer://webhookHome>
BalancerMember http://localhost:8981 route=route1
ProxySet lbmethod=bybusyness
</Proxy>
<Location /webhook>
Order allow,deny
Allow from all
ProxyPass balancer://webhookHome stickysession=JSESSIONID
</Location>
<Proxy balancer://OneDevOpsHome>
BalancerMember http://localhost:8081/insights
ProxySet lbmethod=bybusyness
</Proxy>
<Location /insights>
Order allow,deny
Allow from all
ProxyPass balancer://OneDevOpsHome stickysession=JSESSIONID
</Location>
ProxyPass "/PlatformService/" "http://localhost:8080/PlatformService/"
Activate the Certificate
First, check your configuration file for syntax errors by typing:
Step 11: sudo apachectl configtest
As long as the output ends with Syntax OK, you are safe to continue. If this is not part of your output, check the syntax of your files and try again:
. . .
Syntax OK
Restart the Apache server to apply your changes by typing:
Step 12: sudo systemctl restart httpd.service
Step 13: Make change in the server-confing.json (location: /usr/INSIGHTS_HOME/.InSights ) grafanaEndpoint
"grafanaEndpoint": "http://ip:3000" to
"grafanaEndpoint" : "https://ip/grafana"
Step 14: Change grafana host in the uiConfig.json file in the location: /opt/apache-tomcat-8.5.27/webapps/app/config
"grafanaHost": "http://ip:3000", to "grafanaHost": "https://ip/grafana",
Change Sevicehost in the uiConfig.json file in the location: /opt/apache-tomcat-8.5.27/webapps/app/config
"serviceHost": "ip:8080", to "serviceHost": "ip",
Step 15: create a file file name custom.ini in the location /opt/grafana/conf
add the following contents
[server]
root_url = http://localhost:3000/grafana
Step 5: Restart Grafana
Step 6: Restart Tomcat
Prerequisites:
OS: Windows
- Java
- VC_redist.x64.exe
Step 1:
- Download and install VC_redist.x64.exe
- Reference : https://www.sts-tutorial.com/sites/downloadCenter.php?cRedistributable2015
Step 2:
- Download and unzip Apache2 in C drive. For Ex: path is C:/Apache24
- Reference : https://www.apachelounge.com/download/
Step 3:
- Create folder for storing html document files. Do the below in command prompt in C: drive
mkdir ApacheWebPages
Step 4: Take backup and Delete file contents httpd.conf in the folder location C:\Apache24\conf
copy file contents from httpd.conf
and paste in the file.
Step 5: Take backup and Delete file contents httpd-vhosts.conf in the folder location C:\Apache24\conf\extra
copy file contents from httpd-vhosts.conf
Step 6:
- Open command prompt and do the below
- cd c:/Apache24/bin
- httpd -t
- httpd -k install
Step 7: Create a file custom.ini in the grafana conf folder /grafana/conf/
update the file with content
[server] root_url = http://localhost:3000/grafana
Step 8: Make change in the server-confing.json (location: INSIGHTS_HOME/.InSights ) grafanaEndpoint
"grafanaEndpoint": "http://ip:3000" to
"grafanaEndpoint" : "http://ip/grafana"
Step 9: Change grafana host in the uiConfig.json file in the location: /apache-tomcat-8.5.27/webapps/app/config
"grafanaHost": "http://ip:3000", to "grafanaHost": "http://ip/grafana",
Change Sevicehost in the uiConfig.json file in the location: apache-tomcat-8.5.27/webapps/app/config
"serviceHost": "ip:8080", to "serviceHost": "ip",
Step 10: Restart Grafana
Step 11: Restart Tomcat
Step 12: Check the following url in browser for respective tools
http://localhost/insights/ -> Insights
http://localhost/mq/ -> Rabbitmq
http://localhost/neo4j/ -> Neo4j
http://localhost/webhook/ -> Webhook
http://localhost/grafana/ -> Grafana
Prerequisites:
OS: Windows
- Java
- VC_redist.x64.exe
Step 1:
- Download and install VC_redist.x64.exe
- Reference : https://www.sts-tutorial.com/sites/downloadCenter.php?cRedistributable2015
Step 2:
- Download and unzip Apache2 in C drive. For Ex: path is C:/Apache24
- Reference : https://www.apachelounge.com/download/
Step 3:
- Open command prompt and do the below
- cd c:/Apache24/bin
- httpd -t
- httpd -k install
Step 4: Crete open ssl certificate
- Open command prompt and do the below
- cd c:/Apache24/conf
- openssl req -new -newkey rsa:4096 -x509 -sha256 -days 365 -nodes -out insightsdemo.crt -keyout insightsdemo.key
Fill out the prompts appropriately. The most important line is the one that requests the Common Name. You need to enter the domain name that you want to be associated with your server. You can enter the public IP address instead if you do not have a domain name.
The full list of prompts will look something like this:
Country Name (2 letter code) [XX]:US
State or Province Name (full name) []:Example
Locality Name (eg, city) [Default City]:Example
Organization Name (eg, company) [Default Company Ltd]:Example Inc
Organizational Unit Name (eg, section) []:Example Dept
Common Name (eg, your name or your server's hostname) []:example.com
Email Address []:webmaster@example.com
Step 5: Take backup and Delete file contents httpd.conf in the folder location C:\Apache24\conf
copy file contents from httpd.conf
and paste in the file.
Step 6: Take backup and Delete file contents httpd-vhosts.conf in the folder location C:\Apache24\conf\extra
copy file contents from httpd-vhosts.conf
Step 7: Create a file custom.ini in the grafana conf folder /grafana/conf/
update the file with content
[server]
root_url = http://localhost:3000/grafana
Step 8: Make change in the server-confing.json (location: INSIGHTS_HOME/.InSights ) grafanaEndpoint
"grafanaEndpoint": "http://ip:3000" to
"grafanaEndpoint" : "https://ip/grafana"
Step 9: Change grafana host in the uiConfig.json file in the location: /apache-tomcat-8.5.27/webapps/app/config
"grafanaHost": "http://ip:3000", to "grafanaHost": "https://ip/grafana",
Change Sevicehost in the uiConfig.json file in the location: apache-tomcat-8.5.27/webapps/app/config
"serviceHost": "ip:8080", to "serviceHost": "ip",
Step 10: Restart Grafana
Step 11: Restart Tomcat
Step 12: Check the following url in browser for respective tools
https://localhost/insights/ -> Insights
https://localhost/mq/ -> Rabbitmq
https://localhost/neo4j/ -> Neo4j
https://localhost/webhook/ -> Webhook
https://localhost/grafana/ -> Grafana
©2021 Cognizant, all rights reserved. US Patent 10,410,152